
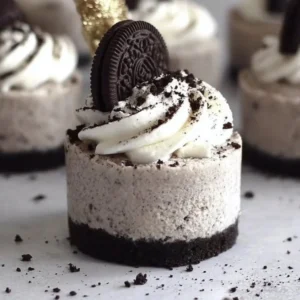
No-Bake Oreo Cheesecake: A Cozy Treat for Every Occasion
As the days grow shorter and the golden hues of autumn blanket the world, I find myself drawn to the comforting realm of desserts that remind me of cherished moments spent with loved ones. One of those special treats is my No-Bake Oreo Cheesecake. This creamy, dreamy delight mixes the beloved flavor of classic Oreo biscuits with the velvety texture of cheesecake, delivering a wave of nostalgia that warms the heart.
Whether you’re gathering around the kitchen table for family game night or hosting a cozy gathering with friends, this easy weeknight dessert is sure to bring smiles all around. It’s a recipe that encapsulates moments of joy, laughter, and togetherness—one you’ll definitely want to pin for later!
Why You’ll Love This Recipe
- No-Bake Convenience: Perfect for busy days, this dessert requires no baking, making preparation a breeze.
- Crowd-Pleasing Flavor: With its rich, chocolatey Oreo crust paired with smooth cream cheese filling, it’s a dessert that everyone will adore.
- Quick Assembly: In just a handful of simple steps, you’ll have impressive dessert cups ready to chill.
- Family-Friendly Fun: Kids will love helping to crush the cookies and assemble their own little dessert cups, making this a sweet family activity.
- Make-Ahead Magic: Prepare your cheesecake in advance and let it chill in the fridge until your gathering, ensuring you’re worry-free when guests arrive.
Ingredients You’ll Need for No-Bake Oreo Cheesecake
To create this indulgent yet easy-to-make dessert, you’ll need the following ingredients:
- 24 Oreo biscuits
- 5 tablespoons unsalted butter, melted
- 8 ounces cream cheese, softened
- 1/2 cup granulated sugar
- 1 teaspoon vanilla extract
- 1 cup whipped cream (store-bought or homemade)
How to Make No-Bake Oreo Cheesecake
Let’s embark on this cozy baking journey together! Here’s how to whip up your No-Bake Oreo Cheesecake in simple steps:
-
Start by crushing the Oreo biscuits in a food processor or by placing them in a sealed bag and using a rolling pin. Aim for a fine crumb, then mix with the melted butter. Press this mixture firmly into the bottom of your dessert cups to create a delightful crust.
-
In a mixing bowl, combine softened cream cheese, granulated sugar, and vanilla extract. Use a hand mixer or stand mixer to blend these ingredients until the mixture is smooth and creamy, filling your kitchen with a heavenly aroma.
-
Carefully fold in the whipped cream, ensuring the combination remains light and airy. This is where your cheesecake truly comes together, creating a luscious filling that will melt in your mouth.
-
Spoon the Oreo cheesecake filling over the crust in your dessert cups. Take your time with this step; each cup should be filled generously with that blissful creaminess!
-
Finish off your creation by topping each dessert with a swirl of additional whipped cream and a sprinkle of crushed Oreo cookies for that extra crunch.
-
Now, it’s time for the hardest part—refrigerate your delightful cheesecake cups for at least one hour before serving. This chilling time allows the flavors to meld beautifully!
Variations & Creative Twists
Feeling adventurous? Here are some fun ways to customize your No-Bake Oreo Cheesecake:
-
Mint Infusion: Add a splash of peppermint extract to the cream cheese mixture for a zesty twist. Top with whipped cream and mini chocolate mint candies.
-
Peanut Butter Lovers: Fold in creamy peanut butter into the cream cheese blend for an indulgent, nutty flavor. Top with crushed peanuts or chocolate-covered pretzels for delightful crunch.
-
Fruit Delight: Swirl in some fresh berry puree, like raspberry or strawberry, to create a colorful and refreshing version, perfect for warm days.
-
Chocolate Fudge Drizzle: Drizzle melted chocolate over the top before chilling. It adds a rich touch that chocoholics will swoon over!
Chef Emma’s Helpful Tips
To ensure your No-Bake Oreo Cheesecake turns out perfectly every time, here are some helpful tips from my cozy kitchen:
-
Make-Ahead Convenience: This dessert can be made a day in advance, making it a lifesaver for busy hosts. Just cover and store in the fridge until ready to serve.
-
Easier Slicing: If you prefer to serve this as a whole cheesecake rather than in cups, simply use a springform pan for easy removal and slicing.
-
Ingredient Swaps: Feel free to use lower-fat cream cheese or whipped topping for a lighter version. It still tastes fantastic!
-
Storage Suggestions: Keep any leftovers in an airtight container in the refrigerator. They’ll stay fresh for up to three days—if they last that long!
Nutrition Information per Serving
While I believe in indulging in treats, it’s always good to know what’s inside. Here’s the nutrition breakdown for one serving (yielding about 6 servings):
- Serving Size: 1 dessert cup
- Calories: 350
- Carbohydrates: 40g
- Sugar: 25g
- Fat: 20g
- Protein: 4g
- Sodium: 150mg
Frequently Asked Questions
-
Can I make this ahead? Yes! You can prepare your No-Bake Oreo Cheesecake up to 24 hours in advance for convenience.
-
Can I use different ingredients? Absolutely! Feel free to experiment with various biscuits for the crust or swap in flavored cream cheese.
-
How do I store leftovers? Store any leftover cheesecake cups in an airtight container in the fridge for up to three days.
-
How long does it last? When properly stored, this delightful dessert will stay fresh for about 3 days.
Final Thoughts
There’s something undeniably comforting about sweet treats that whisk us back to simpler times. My No-Bake Oreo Cheesecake is not just a recipe; it’s a heartfelt experience to share with friends and family. As you savor each creamy, cookie-filled bite, you’ll find warmth in every forkful, making memories that last a lifetime.
Save this No-Bake Oreo Cheesecake to your favorite dessert board so it’s ready when you need a cozy treat! I can’t wait for you to experience this deliciousness—happy baking!
No-Bake Oreo Cheesecake
Ingredients
For the Crust
- 24 pieces Oreo biscuits Crushed into fine crumbs.
- 5 tablespoons unsalted butter, melted To combine with the crushed Oreos.
For the Filling
- 8 ounces cream cheese, softened Ensure it's at room temperature for easy mixing.
- 1/2 cup granulated sugar For sweetness.
- 1 teaspoon vanilla extract Adds flavor.
- 1 cup whipped cream Store-bought or homemade.
Instructions
Preparation of the Crust
- Crush the Oreo biscuits in a food processor or by placing them in a sealed bag and using a rolling pin. Aim for a fine crumb.
- Mix the crushed Oreos with the melted butter and press firmly into the bottom of dessert cups to create a crust.
Preparation of the Filling
- In a mixing bowl, combine softened cream cheese, granulated sugar, and vanilla extract. Blend until smooth and creamy.
- Gently fold in the whipped cream to maintain a light and airy texture.
Assembling the Dessert
- Spoon the Oreo cheesecake filling over the crust in each dessert cup generously.
- Top each cup with a swirl of additional whipped cream and a sprinkle of crushed Oreo cookies.
Chilling
- Refrigerate cheesecake cups for at least one hour before serving to allow flavors to meld.